How you look at it
>> Monday, September 3, 2012 –
bananas,
elephant ears,
panorama,
vines
Today we'll look at one part of my backyard garden. It's the spot closest to the house, and is probably the most visible planting area back here, at least to me. I see it when I look out the windows, when I'm up on the deck, when I come out of the garage and go down to the patio.

In other words, I look at it more than almost any other part of the garden, so I want it to be as pleasing as possible. As I was trying to take photos that gave a good sense of the spot I realized that it really matters how exactly you look at it -- so I'll show you different attempts at this, and you can judge which are most effective.
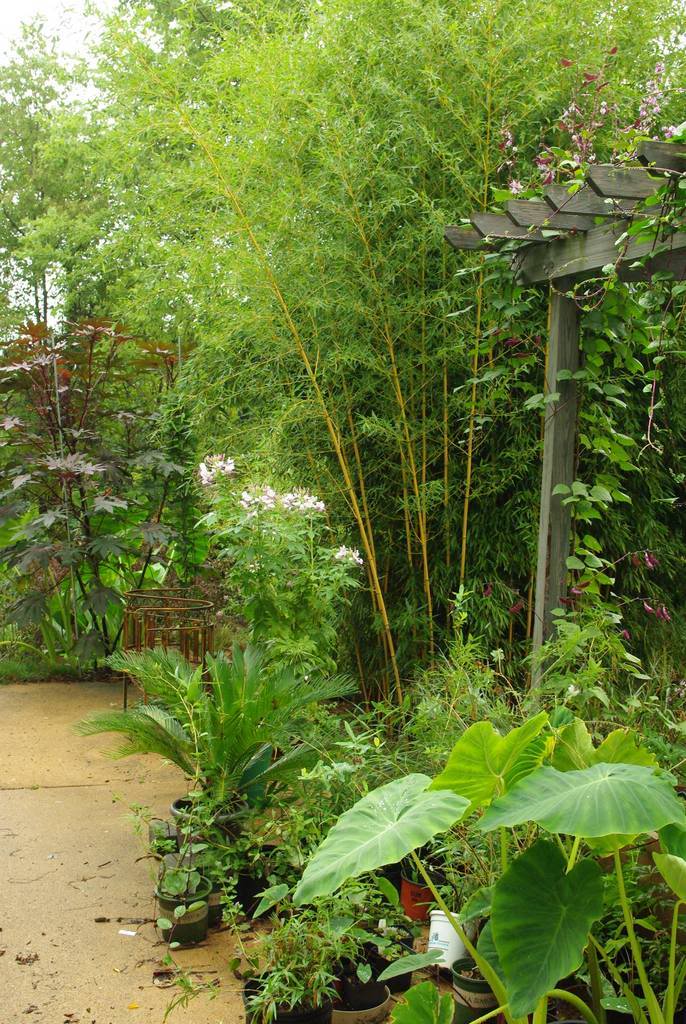
First, an attempt to show some of the plants in some detail (the photo above). I didn't try to get every plant into the shot, but it lets you see the ones that are there pretty clearly. That was taken at a 26mm focal length on my 18-55 zoom lens (smaller focal lengths produce wider shots, and longer focal lengths give tight, zoomed-in results).
It's a nice image but doesn't let you see enough. So let's try stepping back a bit and rotating the camera:

That was also shot at 26mm, and definitely lets you see the vertical elements of the pergola and vine. You can see more of the foreground plants too.
I'll identify some of the plants, as I've been pretty lax about this recently: the elephant ears in front are some of the dozen or so Colocasia I wasn't able to find homes for. There's also a golden/red Coleus, a couple of Alocasia, and a spider plant -- I really need to do a separate post on that guy one day as it's an amazingly tough plant! Then the pergola contains Malabar spinach in the middle, hyacinth bean vine on the left, and a snail vine that you can't really see on the right. In the background behind the right post is a large potted Mexican petunia.
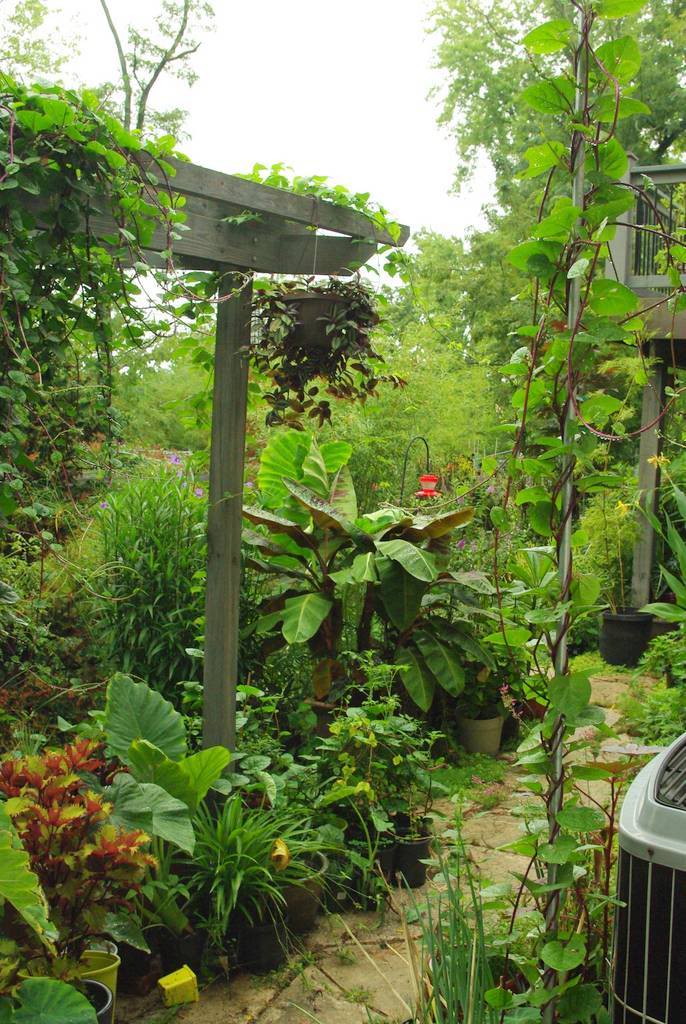
That shot was better, but still doesn't show enough -- there's a lot more going on back here that I want to convey to you. So I zoomed all the way out to 18mm (the widest shot this lens can give me) and took a step or two to the left to get a different angle:

Now you're starting to get a sense for the space! I don't know about you, but I like seeing not only the plants in people's gardens, but the garden too -- which requires wide shots that you unfortunately don't often get to see.
Now we can see the blood banana, the hanging Tradescantia, the other Malabar spinach on the single-pole trellis next to the air conditioner -- lots more. You can even see a bit of the bamboo plant on the left. It's still not enough though, as there are more plants in the center of the image behind the Mexican petunia and blood banana, and you just can't see them from this angle. So I need to get at least one shot from the other side.
I also like to mix in at least one photo taken from a surprising vantage point if possible: by getting down on the ground, from the "back side" of the plants if that's possible, or in this case from above on the deck:

I got my reverse-angle shot from this too. From the upper left corner of the image moving toward the lower right you can see another Malabar spinach that's growing as a groundcover -- it's really nice and I should have taken at least one shot of it -- the blood banana and Mexican petunia, a couple of Colocasia that are taller than I had hoped and have a hard time unrolling new leaves for some reason, an umbrella plant, a papyrus, another Colocasia, a couple of Coleus, a potted Buddleia, my bigger Plumeria, a purple fountain grass, Mexican sage, culinary sage, Siberian iris... and a few more that you can't easily see. This reverse angle really revealed a lot! (As always click for larger image to see more details).
But seeing the wide shots alone is not enough. You need to add some tighter shots of the most interesting plants and plant combinations:

That was taken at 23mm, so still fairly wide-angled. If I wanted to show mainly the Coleus I would have zoomed in more of course, but that's not my intent here. As I mentioned, I should have taken more close-ups of several plants, but that wasn't my focus at the time -- I wanted a sense of the space.
Nothing does that better than a nice, wide panoramic shot!
To create a panorama you need either a camera with a really high resolution and a wide-angle lens, or any old camera plus a photo-stitching application. That's the method I use, so I take several overlapping images:

Then use the photo-stitching app to meld them together. I use Hugin (which is free), but there are other solutions available -- most of them are not free. On my iPhone I use an app called "AutoStitch" which is handy to have. These are very easy to use: just select the images and click a button or two.
In any case, here's the result:
 |
| click for much larger version |
So the point of all of this is simply: when you're taking photos of a plant in your garden, take a variety of shots, and let me see not only the plant, but a view of the space where this subject plant is growing -- I want to see more!
.


Beautiful look at your garden Alan...it's a jungle! (and that's a good thing)
It's so green, it almost hurts my eyes! Can I have some of that lushness? I'll trade you for a chunk of late-summer brown!
Absolutely beautiful ... I could look at this all day!